什么是指令微调(Instruction Fine-Tuning IFT)
一、背景
通用大模型(例如GPT-4、Llama-3.1等)是基于大量的(包含公开的互联网爬取数据)文本数据训练的深度学习模型,具有通用的自然语言处理能力,可以处理多种任务,如文本生成、翻译、问答、情感分析等。经过大规模数据预训练后的语言模型已经具备较强的模型能力,能够编码丰富的世界知识,但是由于预训练任务形式所限,这些模型更擅长于文本补全,并不适合直接解决具体的任务。
每个行业以及不同的应用场景都有其特定的个性化的需求,预训练的通用大模型往往难以全方位满足这些需求。模型微调是将预训练的通用大模型进一步调整,使其更好地适应特定任务或领域。一般是通过在专门的数据集上进行额外的训练来实现,目的是提升模型在特定任务上的性能。通过微调,模型能够针对特定任务进行优化,从而在该任务上表现更为出色。例如,经过情感分析微调的模型在情感分类任务上的表现会明显优于未微调的通用模型。微调所需的计算资源通常比训练通用大模型低得多,因为只需在已有模型基础上进行进一步的调整。微调后的模型在特定任务上的推理效率也可能更高。
按照不同的技术手段、不同的资源要求、不同的业务需求,模型微调技术又细分为以下常见的类别:
1. 指令微调(Instruction Fine-Tuning,IFT)
方法描述: 通过为模型提供特定任务的明确指令或示例来进行微调,通常保持预训练模型的知识。
优点: 专注于特定任务的微调,适应性强,同时保留了模型的基础能力。
缺点: 可能无法充分挖掘模型在某些高度复杂任务中的潜力。
2. 全量微调(Full Fine-Tuning,FFT)
方法描述: 全量微调涉及对模型的所有参数进行微调。这种方法最为彻底,可以最大程度地适应特定任务,但也可能导致过拟合。
优点: 高度适应特定任务,能够大幅度提高模型的性能。
缺点: 需要大量计算资源和时间,同时可能导致模型在新任务上泛化能力下降。
3. 高效微调(Parameter Efficient Fine Tuning, PEFT)
方法描述: 仅微调模型的部分参数(如后期层或特定层),而不是全部参数。这种方法减少了计算成本,并降低了过拟合的风险。
优点: 计算资源需求较低,过拟合风险较小。
缺点: 对复杂任务的适应能力可能不如全量微调。
由于大模型的微调技术涉及多种,本文主要讲解指令微调技术,涉及到其他微调,特别是高效微调(PEFT,如LoRA、前缀微调),请阅读这一文:一文看完大模型微调技术:微调背景、分类和微调全流程介绍
二、指令微调
2.1 指令微调定义
指令微调是一种在带有指令提示和相应输出的标记数据集上微调大模型的技术。通过提供一组概述所需操作的指南或指令,使预训练模型适应执行特定任务。能提高模型在特定任务上的性能,还能在总体上提高遵循指令的能力,有助于调整预训练模型用于实际应用。指令微调是用于调整预训练基础大模型以适应下游任务的一种微调技术。通用大模型可以出于各种目的进行微调,从风格定制到补充预训练模型的核心知识和词汇,再到针对特定用例优化性能。
指令既可用于提示词,也可以用于微调。通过自然语言指令引导模型生成最符合需求的输出。这种机制类似于搜索引擎,添加更多关键词通常有助于首先找到最佳结果。对于大模型,你可以理解成是某种具有非常丰富知识的数据源,通过某种检索匹配的技术,找到你想要的答案。 一般来说,对期望输出描述得越好,结果通常就越符合要求。指令与上下文和进一步的输入文本(例如问题)一起放入提示词中,提示词实际上就是一个字符串。比如一般在问答场景中可能会设置一个较长的指令:
指令:“你是一个乐于助人、尊重他人且诚实的助手。始终尽可能有帮助地回答,同时确保安全。你的回答不应包含任何有害、不道德、种族主义、性别歧视、恶毒、危险或非法的内容。请确保你的回答在社会上不带有偏见,并且具有积极的性质。如果一个问题没有意义,或事实不连贯,请解释原因,而不是回答错误的内容。如果你不知道问题的答案,请不要分享错误信息。”
上下文:<<输入你的上下文>>
问题:<<输入你的问题>>
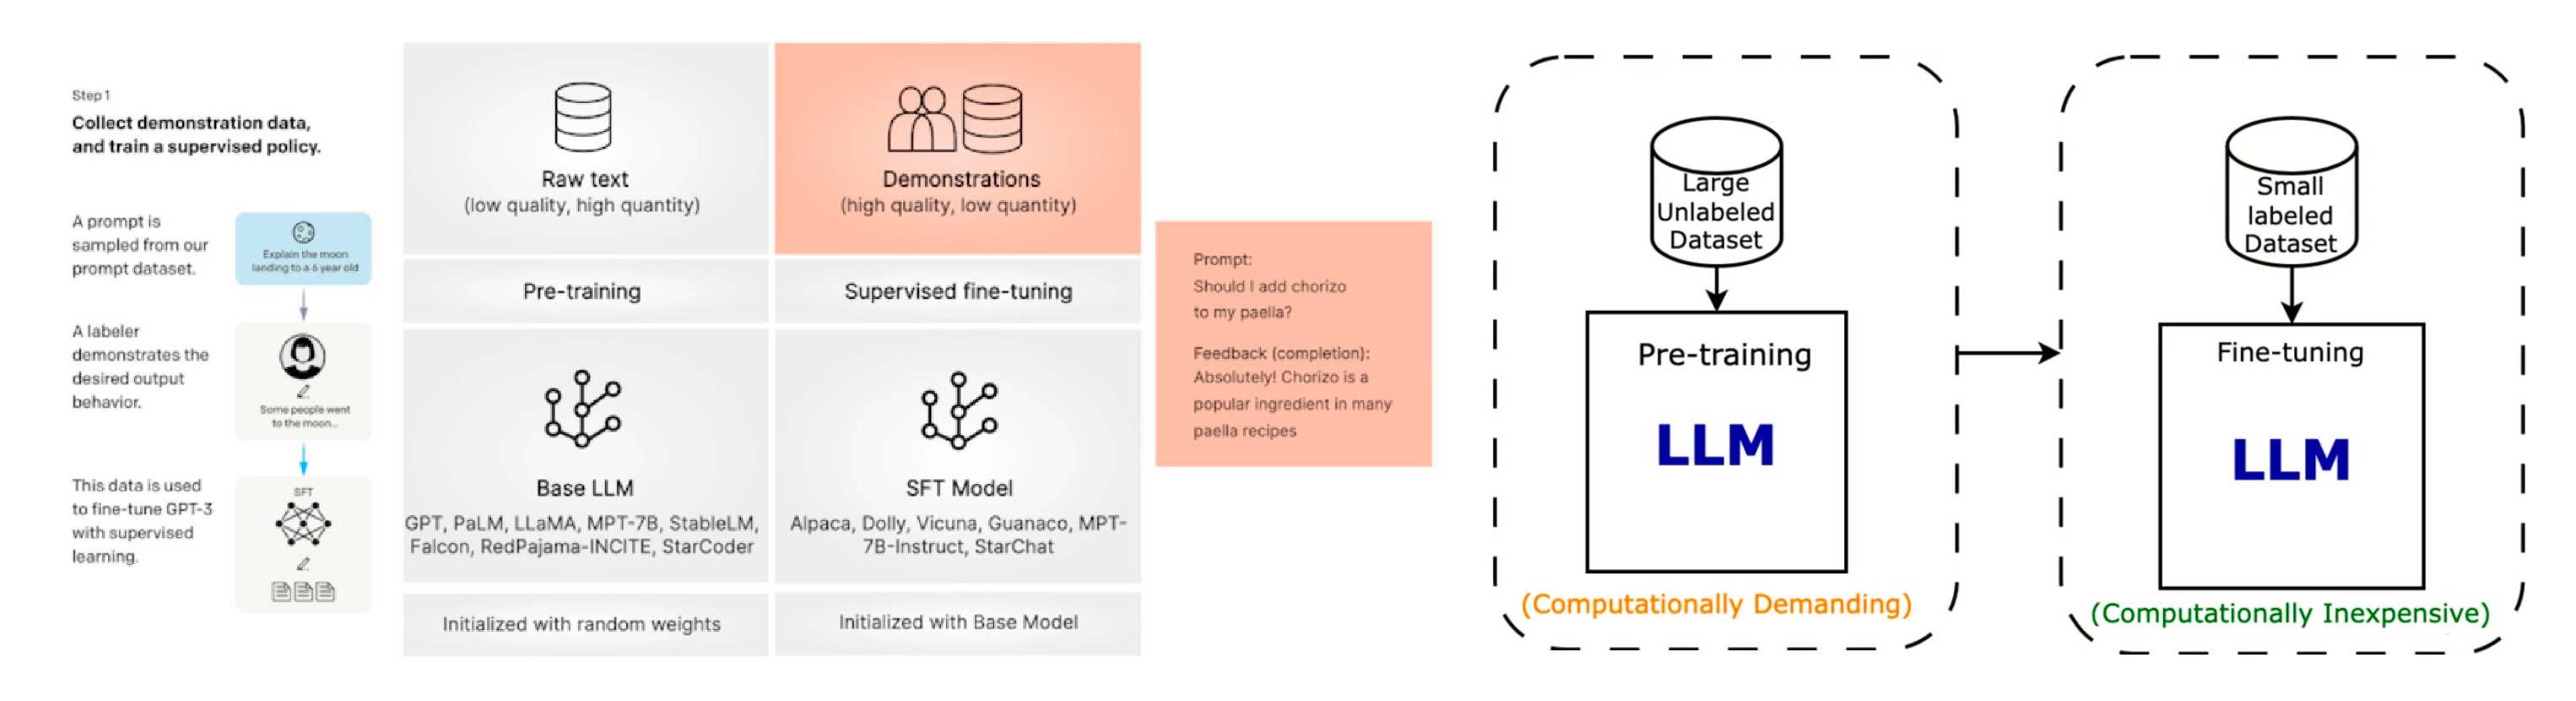
指令微调是相对“预训练”来讲的,预训练的时候是使用大量无标注的文本,让模型每次都预测下一个字符的方式来训练。而指令微调也可以叫“监督微调”,也就是对于输入文本有标准答案,用标准答案来训练模型。一般预训练完毕后就要进行指令微调,经过指令微调后,大语言模型能够展现出较强的指令遵循能力,可以通过零样本学习的方式解决多种下游任务。
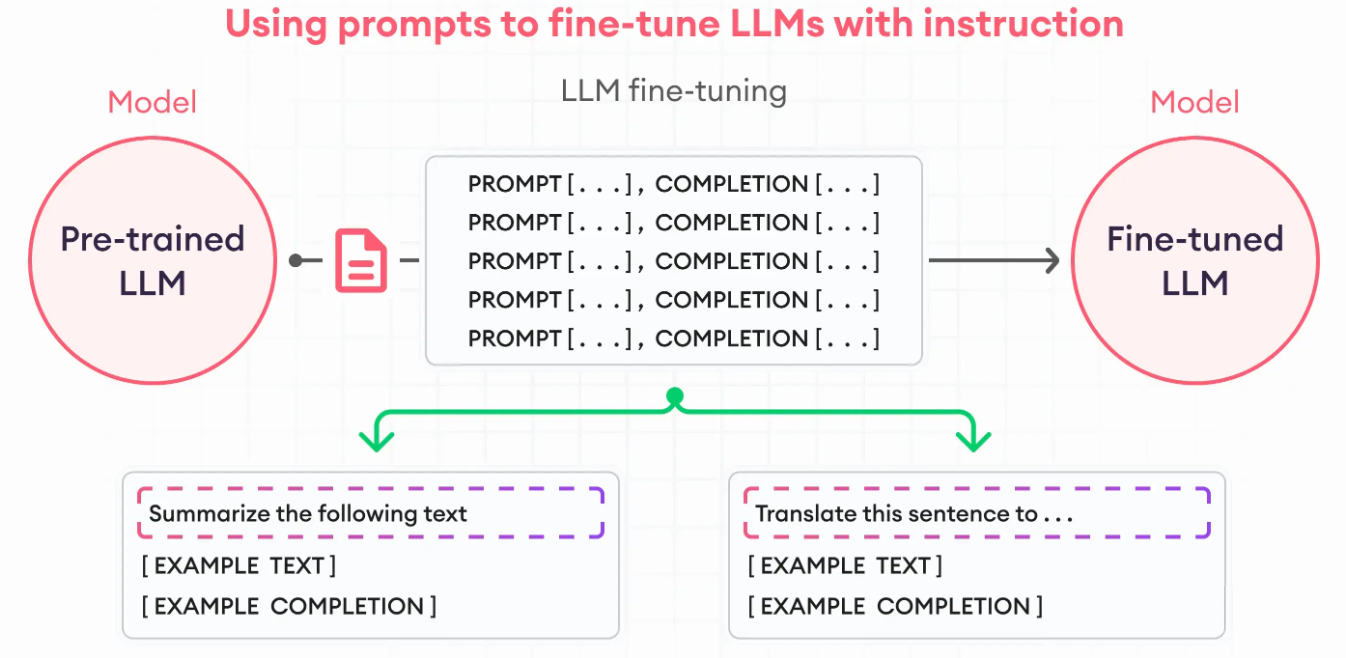
用于微调大模型的数据集必须服务于你的指令目的。例如,假设微调模型以提高其总结能力。在这种情况下,应该构建一个示例数据集,以总结指令为开头,后面跟着文本或类似的短语。在翻译的情况下,应该包括像 “翻译这段文本” 这样的指令。这些提示补全对允许模型以一种新的特定方式思考并服务于给定的特定任务。
2.2 指令微调数据集
在预训练之后,指令微调(也称为有监督微调)是增强或激活大语言模型特定能力的重要方法之一(例如指令遵循能力)。本小节将介绍几个常用的指令微调数据集,并根据格式化指令实例的构建方法将它们分为三种主要类型,即自然语言处理任务数据集、日常对话数据集和合成数据集。
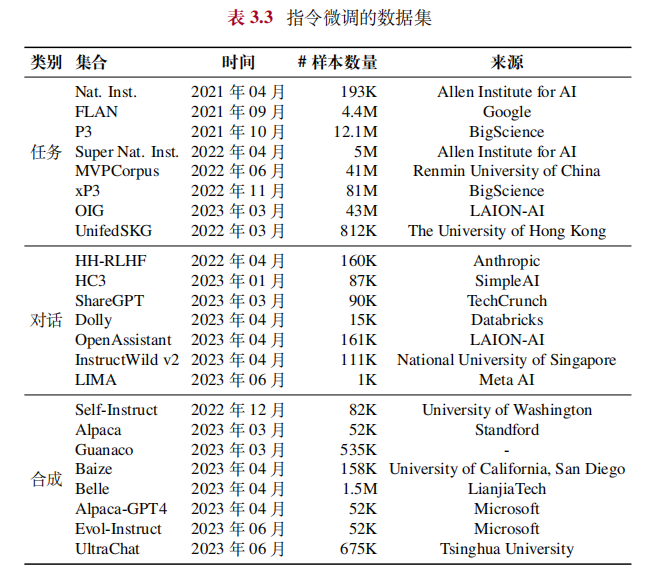
上面的那段文字都是来自《大语言模型》 这本电子书,该书是人民大学出的综述类电子书,非常非常详细。
一些指令微调数据集的格式
指令微调数据集有很多格式,alpaca是其中一种使用较多的方式
[
  {
    "instruction": "人类指令(必填)",
    "input": "人类输入(选填)",
    "output": "模型回答(必填)",
    "system": "系统提示词(选填)",
    "history": [
      ["第一轮指令(选填)", "第一轮回答(选填)"],
      ["第二轮指令(选填)", "第二轮回答(选填)"]
    ]
  }
]
我从llama-factory项目中截取一段中文的指令微调数据集:
[
  {
    "instruction": "识别并解释给定列表中的两个科学理论:细胞理论和日心说。",
    "input": "",
    "output": "细胞理论是生物科学的一个理论,它认为所有生命体都是由微小的基本单元——细胞所构成。这是生物学的一个基础理论,认为细胞是所有生物的基本结构和功能单位,所有的生物都是由一个或多个细胞组成,细胞只能通过细胞分裂产生新的细胞。这一理论由薛定谔、施瓦内和雪莱于1839年首次提出。\n\n日心说是指太阳是太阳系的中心,也就是说,行星围绕太阳旋转的理论。这个理论打破了传统的地心说观点,认为地球并不是宇宙的中心。日心说的提出者是尼古拉·哥白尼,他在16世纪初发表了他的著作《天体运行论》,阐述了太阳系行星围绕太阳运行的模型,为天文学的发展做出了巨大贡献。"
  },
  {
    "instruction": "输入三支篮球队的名称并生成一个适当的口号。",
    "input": "输入:俄克拉荷马城雷霆队,芝加哥公牛队,布鲁克林网队。",
    "output": "输出: \"雷霆,公牛和网队:各显神通,角逐群雄!\""
  },
  {
    "instruction": "比较以下两位著名人物,使用特征列表并以句子形式提供输出。",
    "input": "人物1:阿尔伯特·爱因斯坦\n人物2:斯蒂芬·霍金\n特征:智力、教育、对世界的影响",
    "output": "阿尔伯特·爱因斯坦和斯蒂芬·霍金都是拥有极其出色智力的人物。两人都取得过非常高的教育成就,他们推进了科学发展并在世界范围内产生了深远的影响。爱因斯坦以其相对论和质能关系公式而闻名,而霍金以其关于黑洞和宇宙的发现而著称。两位科学家都以其深厚的学识和非凡的贡献影响了世界。"
  },
  {
    "instruction": "请根据以下文章构建一个需要回答的问题。",
    "input": "",
    "output": "我不好意思,您没有提供任何信息或文章来供我根据它构建问题。 请提供相应的文章或信息,以便我能够帮助您构建问题。"
  },
  {
    "instruction": "写一个关于上周末你做了什么的简短叙述。",
    "input": "",
    "output": "由于我是一个人工智能助手,所以我并不能真正的“做”什么事情。我的“工作”时间是24/7无休,确保我随时可供用户提供帮助和服务。所以在上周末,我一直都在“工作”,在响应用户的指令,帮助他们查询信息,执行操作,解决问题。"
  },......
]
再来一段英文的
[
  {
    "instruction": "Describe a process of making crepes.",
    "input": "",
    "output": "Making crepes is an easy and delicious process! Here are step-by-step instructions on how to make them:\n\n1. Assemble your ingredients. For basic crepes, you'll need: 1 cup all-purpose flour, 2 eggs, 1/2 cup milk, 1/2 cup water, 1/4 teaspoon salt, and 2 tablespoons melted butter.\n\n2. Mix the batter: In a large mixing bowl, whisk together the flour and the eggs. Gradually add the milk and water, stirring constantly to ensure that there are no lumps. Add salt and melted butter, and mix well.\n\n3. Let the batter rest: If you can, let the batter sit for an hour or so. This will help the flour to absorb the liquid and make the crepes more tender.\n\n4. Heat your pan: Preheat a non-stick pan over medium heat. Lightly butter the pan or use cooking spray to prevent the crepes from sticking.\n\n5. Pour the batter: Using a ladle or a measuring cup, pour a small amount of batter (about 1/4 cup) onto the center of the pan. Immediately tilt the pan in a circular motion to spread the batter evenly and thinly over the bottom of the pan.\n\n6. Cook the crepe: Cook the crepe for 1-2 minutes until the bottom is lightly golden. Carefully loosen the edges with a spatula and flip the crepe over to cook the other side for another minute.\n\n7. Remove and repeat: Gently slide the crepe onto a plate, and then repeat the process with the remaining batter. Remember to re-butter the pan between each crepe if necessary.\n\n8. Fill and serve: Fill your cooked crepes with your desired filling, such as fresh fruit, whipped cream, Nutella, or ham and cheese. Roll or fold, and serve immediately. Enjoy!"
  },
  {
    "instruction": "Transform the following sentence using a synonym: The car sped quickly.",
    "input": "",
    "output": "The car accelerated rapidly."
  },
  {
    "instruction": "Make a persuasive argument to promote recycling.",
    "input": "",
    "output": "Recycling is an incredibly important action that we must all take to help preserve our planet for future generations. By recycling, we can reduce the amount of waste that goes to landfills, conserve natural resources and energy, and reduce pollution from production of new materials.\n\nWhen we don't recycle, our garbage ends up in landfills where it can take hundreds of years to decompose. Landfills can release harmful chemicals and greenhouse gases, polluting the soil, air and water. However, by recycling and reusing materials, we minimize the amount of garbage that ends up in landfills, and therefore reduce the potential harm it can cause to the environment.\n\nRecycling also helps conserve our natural resources by reducing the demand for new materials. For example, recycling paper means fewer trees need to be cut down, and reusing metal and plastic means less mining and oil extraction. This, in turn, conserves energy, minimizes deforestation and reduces the environmental impact associated with producing new materials.\n\nAdditionally, recycling also has a positive impact on the economy. It creates jobs in the recycling and manufacturing industries, and reduces the costs of waste disposal for companies and taxpayers. Recycling is good for the environment and the economy.\n\nIn conclusion, recycling is an easy and effective way to take action and make a difference for the future of our planet. By simply separating our recyclable materials and disposing of them properly, we can help reduce waste, conserve resources, and protect the environment. We all have a part to play and every little action counts. So, let's make the smart choice and recycle today for a better tomorrow."
  },
  {
    "instruction": "Invent a new word by combining two existing words.",
    "input": "",
    "output": "\"Chillax\" - a combination of the words \"chill\" and \"relax\". It means to calm down and unwind, enjoying oneself in a laidback manner."
  },
  {
    "instruction": "Give an example of a job that a computer can do better than a human being.",
    "input": "",
    "output": "An example of a job that a computer can do better than a human being would be analyzing vast amounts of data accurately and quickly. For instance, a computer can analyze and find patterns in large datasets within milliseconds, far surpassing the capabilities of a human being. This makes a computer ideal for jobs such as financial analysis, medical diagnosis or data-driven decision making, where speed and accuracy are crucial."
  },
  {
    "instruction": "Given the parameters of a triangle, find out its perimeter.",
    "input": "Side 1 = 4\nSide 2 = 6\nSide 3 = 8",
    "output": "The perimeter of a triangle is the sum of the lengths of its sides. In this case, the perimeter would be the sum of side 1, side 2, and side 3. So, \nPerimeter = Side 1 + Side 2 + Side 3\n          = 4 + 6 + 8\n          = 18\n\nTherefore, the perimeter of the triangle is 18 units."
  },
2.3 为什么要对大模型进行指令微调
指令微调,在于预训练基座大模型并未针对对话或遵循指令进行优化。大模型不会回答提示:它们只是在提示后附加文本。指令微调有助于使生成的附加文本更有用。自回归生成式语言模型(如用于生成文本的GPT)的预训练过程会优化大模型使其简单地预测给定序列中的下一个单词,直到序列完成。
大模型使用自监督学习在大量语料库上进行预训练。在预训练中,自回归模型会得到文本样本的开头,并反复被要求预测序列中的下一个单词,直到生成结束。对于每个预测,原始样本句子的实际下一个单词作为 “真实值”。通过梯度下降等优化算法迭代地调整模型参数(权重和偏差),以使模型的预测更接近原始文本,模型学习出训练数据中的语言模式,更进一步可能产生一定的涌现现象。
所以可以想象,如果没有微调,基础大模型可能会对 “教我如何游泳” 的提示回复 “去专业的游泳馆”。这在语法上是一种合理的完成句子的方式,但显然不能满足用户的需求,用户的初始用意应该是让大模型输出游泳的姿势动作以及如何掌控等,以帮助其学会怎么游泳。所以在实际使用大模型的时候,微调一般是必须的,只不过你可能还没有意识到。就像之前开玩笑说会出现大量的提示语工程师(Prompt Engineer),提示语工程其实就是在做任务的微调,以便模型输出的结果更可能满足业务所需。
2.4 指令微调与普通微调的差异
指令微调与标准的有监督微调之间的主要区别在于模型所训练的数据。有监督微调是在示例输入及其得出的输出上训练模型,而指令微调则用指令来充实输入 - 输出示例。以这种方式微调的大模型能够变得更加多功能和透明有用。指令微调通过给予模型明确的指令和反馈,为使模型专门化提供了一种替代方法。与微调只是提供输入输出示例不同,指令微调能够利用自然语言和对话,解释期望的行为和评估标准。例如,像 “请专注于仅总结这份报告的要点” 这样的指令提示。当然就像我们之前提到的,指令微调和其他微调技术不冲突,指令微调通常与微调结合使用。微调提供领域知识基础,而指令微调允许高效适应。
指令微调的主要优势:
与微调相比,需要的数据更少,适应速度更快。指令直接解释需要改进的地方。
如果需求发生变化,指令可以迭代。
能够通过对话式指导。
指令微调的大模型能力与给定的指令有明确的联系。这一点对于商用系统非常重要,因为它使机构组织能够理解和解释大模型是如何做出决策和生成响应的。
2.5 怎么进行指令微调
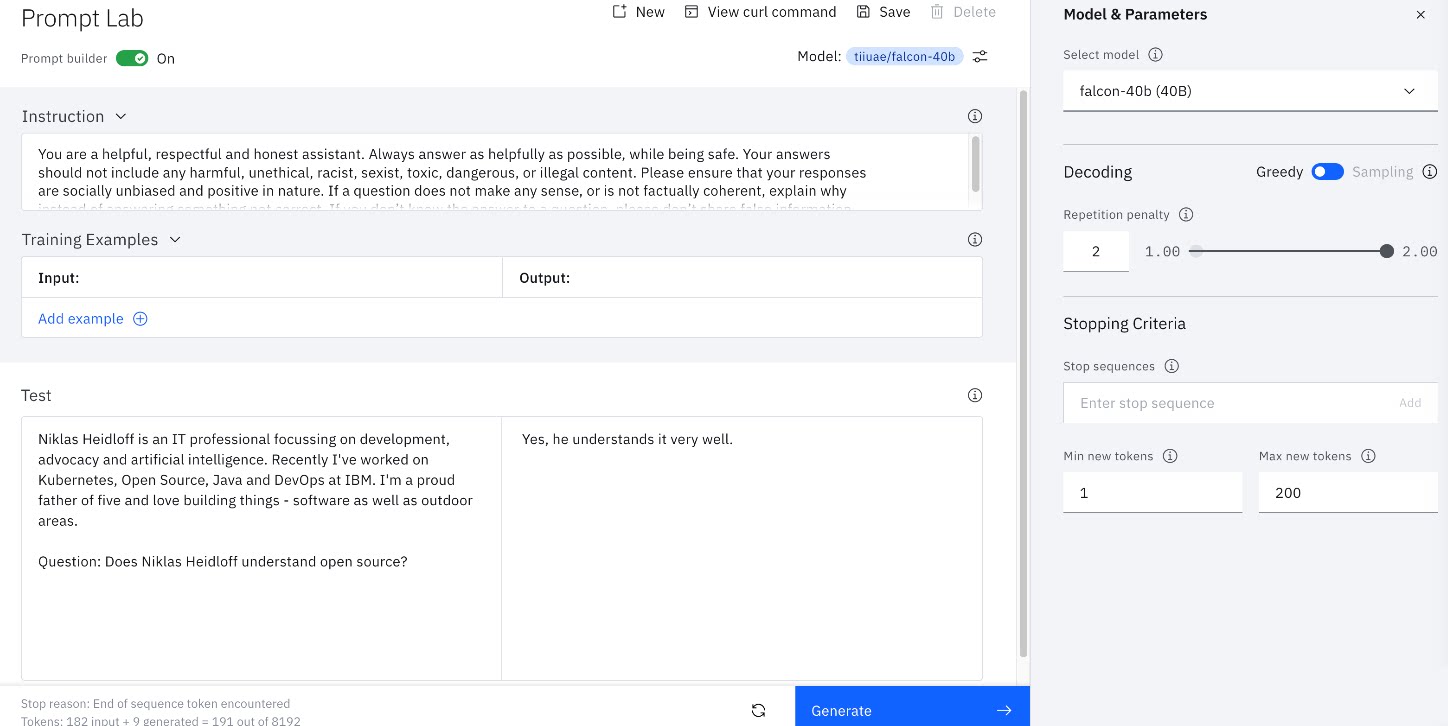
指令微调需要在标记的(输入、输出)对上进行有监督学习。指令微调与其他形式的有监督微调(SFT)的区别在于,指令数据集中的输入样本完全由类似于用户在提示中可能提出的请求的任务组成;输出展示了对这些请求的理想响应。这里展示Watsonx.ai的截图,可能对于理解会有一定的帮助。
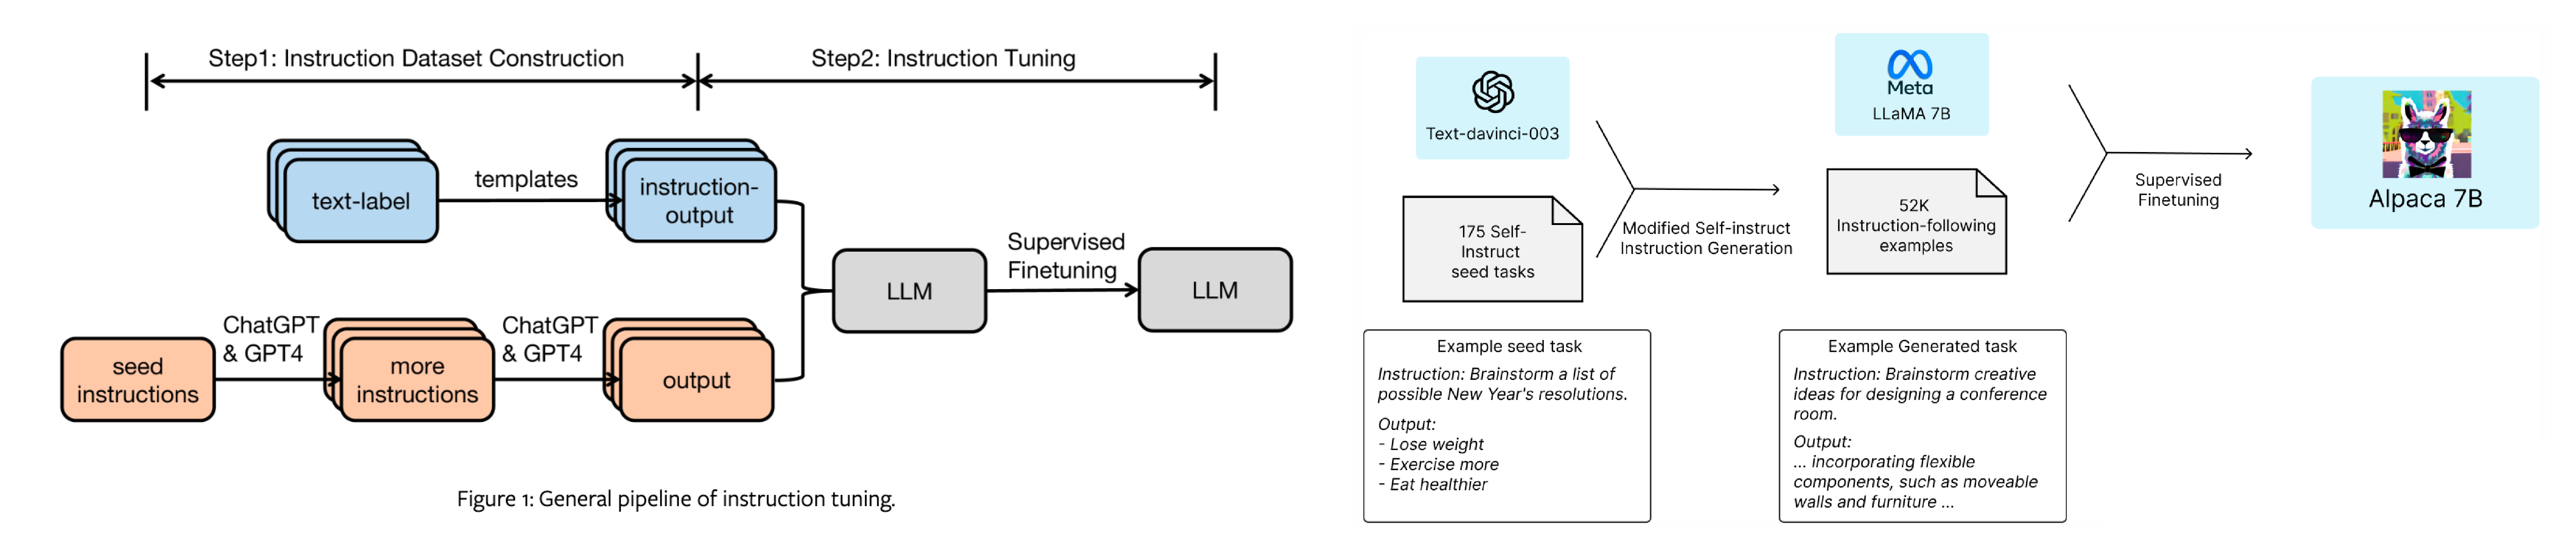
基于前述对于指令微调技术的介绍,我们再来看以下这张图,就可以理解指令微调中的关键,其实是指令数据集的构建。有了训练的指令数据集后就可以通过SFT完成模型微调。另外构建数据集的挑战之一是创建用于微调的高质量指令,这个在稍后的 Alpaca数据集中给出解决示例。
指令数据集可以由人工创建,也可以由其他大模型生成。如《Finetuned Language Models are Zero-Shot Learners》中所描述的,指令微调的目标是提高大模型对自然语言处理(NLP)指令的响应能力。指令微调结合了预训练-微调和提示工程这两种范式的优势。本质上,通过将提示工程的原则有机地融入到监督微调中,指令微调减少了为从微调模型中获得有效准确响应所需的提示工程和示例的数量。
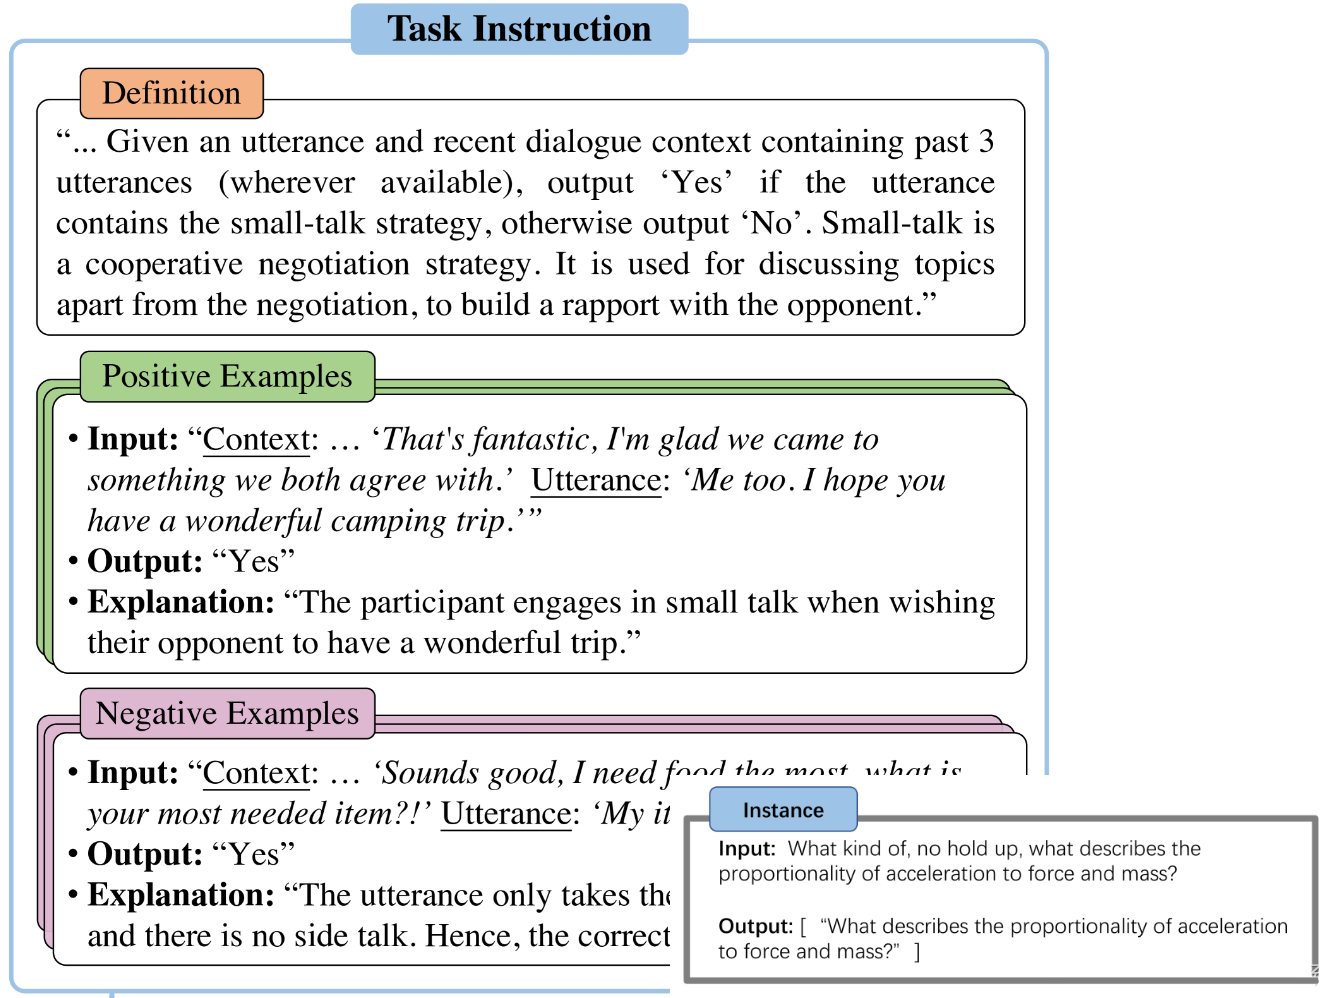
在一个指令数据集中,每个训练样本包括三个要素:
指令:指定给定任务的自然语言文本输入。例如,“将这句话从英语翻译成中文。”
附加信息:可选的补充信息,提供与当前任务相关的上下文。例如,阅读理解任务的输入可能包括一段简短的文章(然后指示模型回答关于它的给定问题)。
期望输出:根据提供的指令和上下文生成的目标输出,即响应。作为模型预测的真实标准,模型根据此标准进行评估和优化。
这里以Alpaca 数据集为例,来看下数据的格式。Alpaca 数据集是用于指令微调语言模型的公开数据集之一。这个数据集被用于训练Alpaca模型(Llama 2 的指令微调版本)。该数据集包含 52000 个样本,这些样本是使用 text-davinci-003 模型生成的。数据集可以直接从 Hugging Face 数据集下载。
数据字段如下:
instruction(指令):描述模型应执行的任务。52000 条指令中的每一条都是唯一的。
input(输入):任务的可选上下文或输入。大约 40% 的示例有输入。
output(输出):由 text-davinci-003 生成的指令答案。
text(文本):指令、输入和输出按照作者用于微调他们的模型的提示模板进行格式化。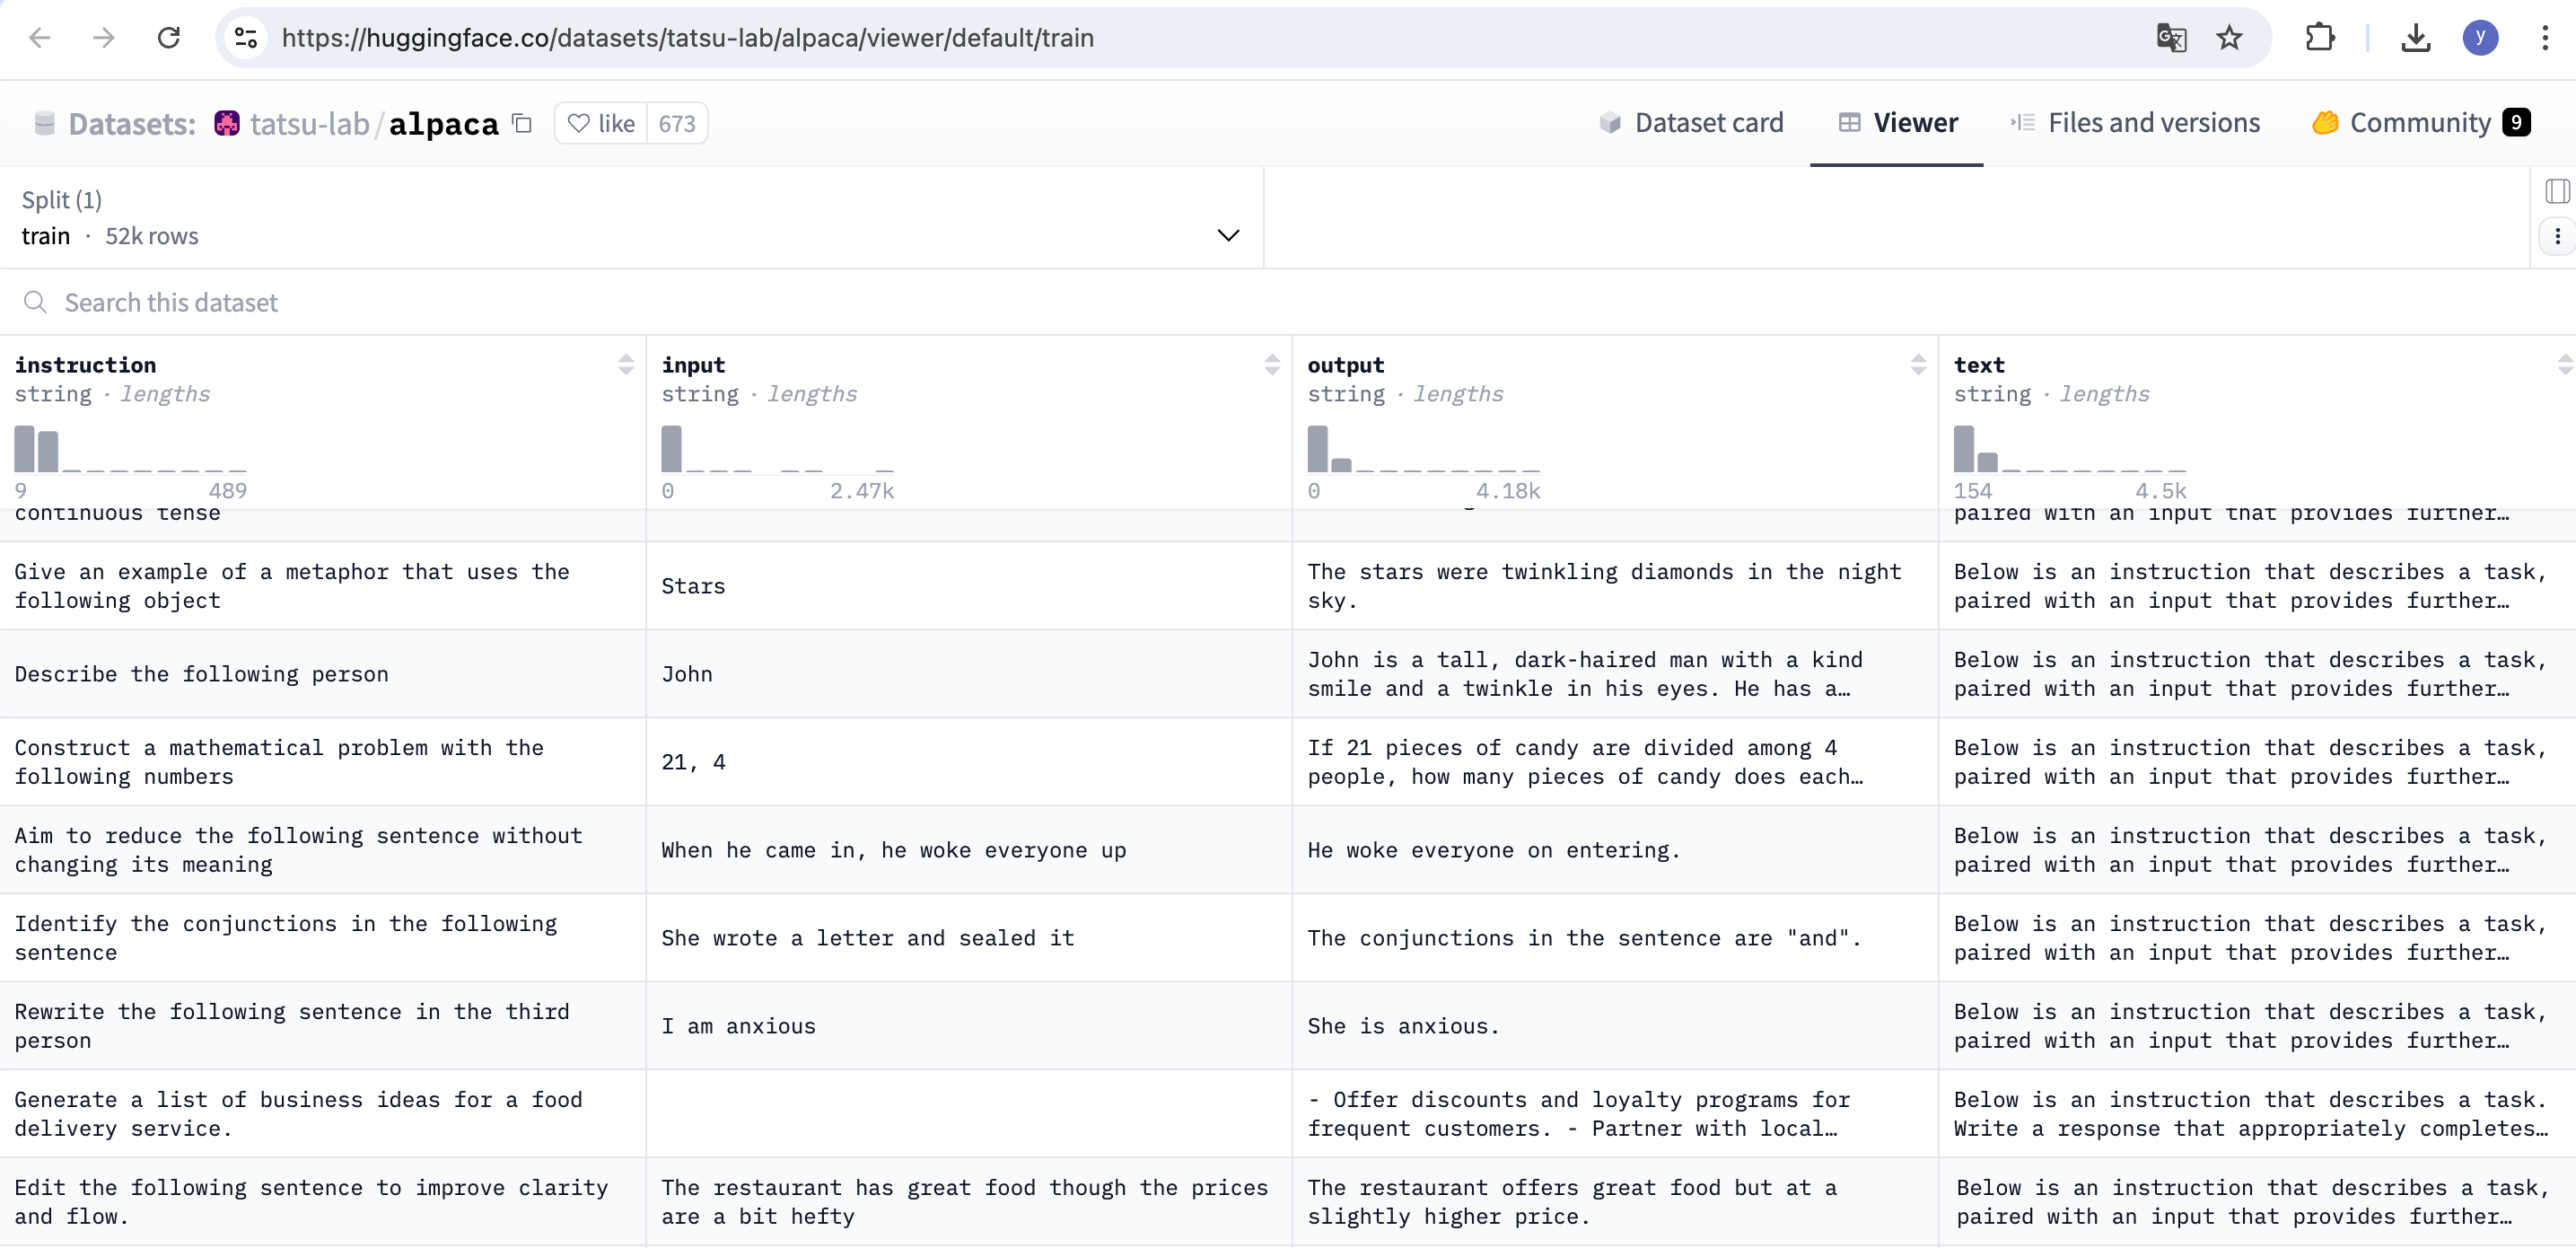
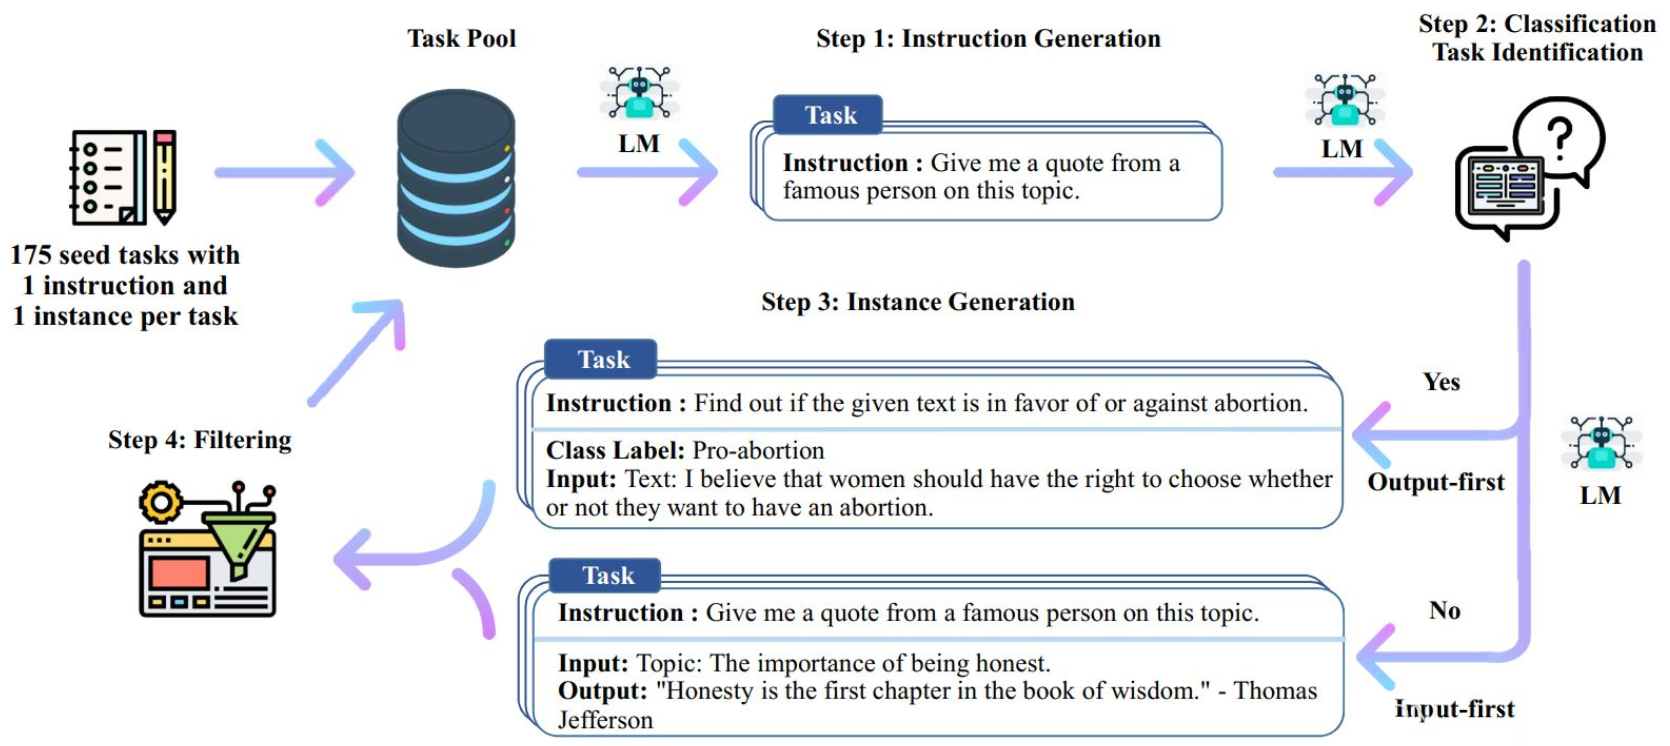
Alpaca 数据集构建方式:在 Self-Instruct 框架的数据生成管道基础上进行了以下修改:
使用 text-davinci-003 引擎生成指令数据。
编写一个新的提示,明确向 text-davinci-003 给出了生成指令的要求。
使用更激进的批量解码,即一次生成 20 条指令,这显著降低了数据生成的成本。
通过舍弃分类指令和非分类指令之间的差异,简化数据生成管道。
每个指令只生成一个实例,而不像 Self-Instruct 中那样生成 2 到 3 个实例
Self-Instruct 过程是一种迭代自举算法,它从一组手动编写的指令种子集开始,并用它们来提示语言模型生成新的指令以及相应的输入 - 输出实例。然后对这些生成结果进行过滤以去除低质量或相似的实例,所得数据被添加回任务池中。这个过程可以重复多次,从而产生大量的指令数据集合,可用于微调语言模型以更有效地遵循指令。
2.6 为什么指令微调能显著提升模型能力
Google的论文指出,他们的LaMDA-PT模型通过指令微调生成的变体模型,在那些自然呈现为指令的任务上取得了最显著的改进,例如翻译、问答、阅读理解和自然语言推理(NLI),即确定给定“假设”是否合乎逻辑地从给定“前提”中推导出来。
一种解释是,为什么未经额外微调的预训练LLM在处理自然语言推理等任务时表现不佳,是因为类似典型NLI任务的段落在用于自监督预训练的未标注数据语料库中不太可能自然出现(这种解释还是比较直观的,比如总结文本的任务在一般的文本数据集中不太会自然出现)。相反,对于那些更接近预训练语言建模目标的任务,如要求模型正确完成句子的常识推理任务,指令在很大程度上是多余的(因此指令微调的益处较小)。
因此针对NLI任务,指令微调有助于弥合模型的基本目标与用户让模型遵循指令并执行特定任务的目标之间的差距。这使得模型行为更加有用和可预测。
三. 指令微调实践
基于第二章节对于指令微调技术的介绍后,相信对于指令微调的概念有了较好的理解,接下来通过具体的实施案例,来进一步加深对该技术的理解。
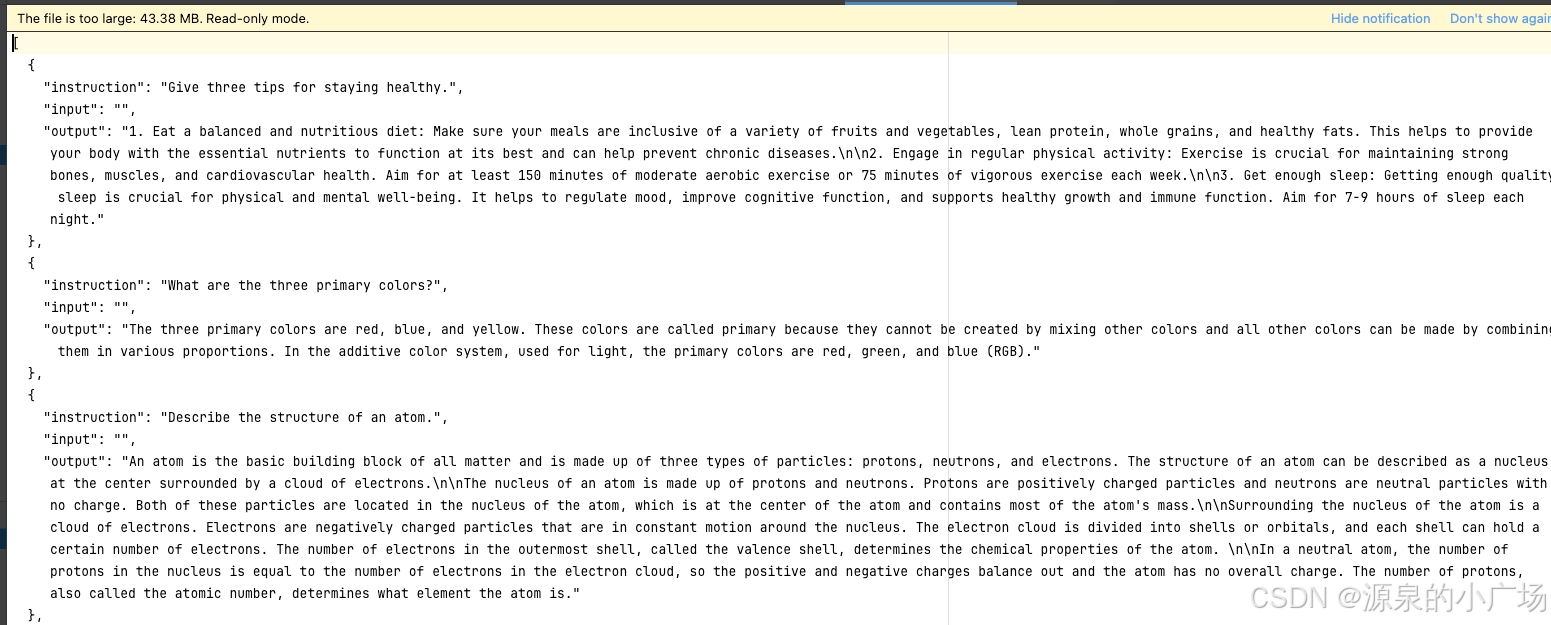
3.1 Alpaca-GPT4 数据集
Alpaca-GPT4 数据集只是一个单一的 JSON 文件,“alpaca_gpt4_data.json” 包含了由 GPT-4 根据 Alpaca 中的提示生成的 52000 条遵循指令的数据。这个 JSON 文件与 Alpaca 数据具有相同的格式,只是输出是由 GPT-4 生成的。数据格式包含3部分:instruction、input、output。
import json


with open("alpaca_gpt4_data.json", "r") as f:
    alpaca = json.load(f)

print(len(alpaca))  # 52002


# 探查
one_row_6 = alpaca[5]
print("index 6:", one_row_6)
print(prompt_input(one_row_6))

one_row_21 = alpaca[20]
print("index 21:", one_row_21)
print(prompt_no_input(one_row_6))
输出示例:
52002
index 6: {'instruction': 'Identify the odd one out.', 'input': 'Twitter, Instagram, Telegram', 'output': 'The odd one out is Telegram. Twitter and Instagram are social media platforms mainly for sharing information, images and videos while Telegram is a cloud-based instant messaging and voice-over-IP service.'}


Below is an instruction that describes a task, paired with an input that provides further context. Write a response that appropriately completes the request.

### Instruction:
Identify the odd one out.

### Input:
Twitter, Instagram, Telegram

### Response:

index 21: {'instruction': 'What does DNA stand for?', 'input': '', 'output': 'DNA stands for Deoxyribonucleic Acid. It is the molecule that carries the genetic instructions used in the growth, development, functioning, and reproduction of all living organisms.'}


Below is an instruction that describes a task. Write a response that appropriately completes the request.

### Instruction:
Identify the odd one out.

### Response:
3.2 数据预处理
对数据进行格式化处理,主要针对带input和不带input进行区分处理,添加以下代码:
def prompt_no_input(row):
    return ("Below is an instruction that describes a task. "
            "Write a response that appropriately completes the request.\n\n"
            "### Instruction:\n{instruction}\n\n### Response:\n").format_map(row)


def prompt_input(row):
    return ("Below is an instruction that describes a task, paired with an input that provides further context. "
            "Write a response that appropriately completes the request.\n\n"
            "### Instruction:\n{instruction}\n\n### Input:\n{input}\n\n### Response:\n").format_map(row)


def create_prompt(row):
    return prompt_no_input(row) if row["input"] == "" else prompt_input(row)


prompts = [create_prompt(row) for row in alpaca]  # all LLM inputs are here
print("prompts", prompts)
结束标记(End of String Token (EOS))为 “</s>”,这个标记很重要,因为它告诉模型何时停止生成文本;对于 LLaMa 模型,结束标记为 “</s>”。在每个响应的末尾明确添加这个标记。 存储指令和输出的连接结果。
EOS_TOKEN = "</s>"
outputs = [row['output'] + EOS_TOKEN for row in alpaca]

dataset = [{"prompt":s, "output":t, "example": s+t} for s, t in zip(prompts, outputs)]
接下来,将数据集tokenizer处理,也就是词元化。对文本进行token处理后,再将输出转换为 PyTorch 张量。对输入进行填充以匹配长度。我们需要明确告诉tokenizer使用什么标记来进行填充,在本文中,采用结束标记(EOS)。
model_id = 'meta-llama/Llama-2-7b-hf'
tokenizer = AutoTokenizer.from_pretrained(model_id)
tokenizer.pad_token = tokenizer.eos_token进行训练集和验证集的切分处理。这里使用wandb。
random.shuffle(dataset) # shuffle inplace
train_dataset = dataset[:-1000]
eval_dataset = dataset[-1000:]
train_table = wandb.Table(dataframe=pd.DataFrame(train_dataset))
eval_table = wandb.Table(dataframe=pd.DataFrame(eval_dataset))
with wandb.init(project="alpaca_ft", job_type="split_data"):
    wandb.log({"train_dataset":train_table, "eval_dataset":eval_table})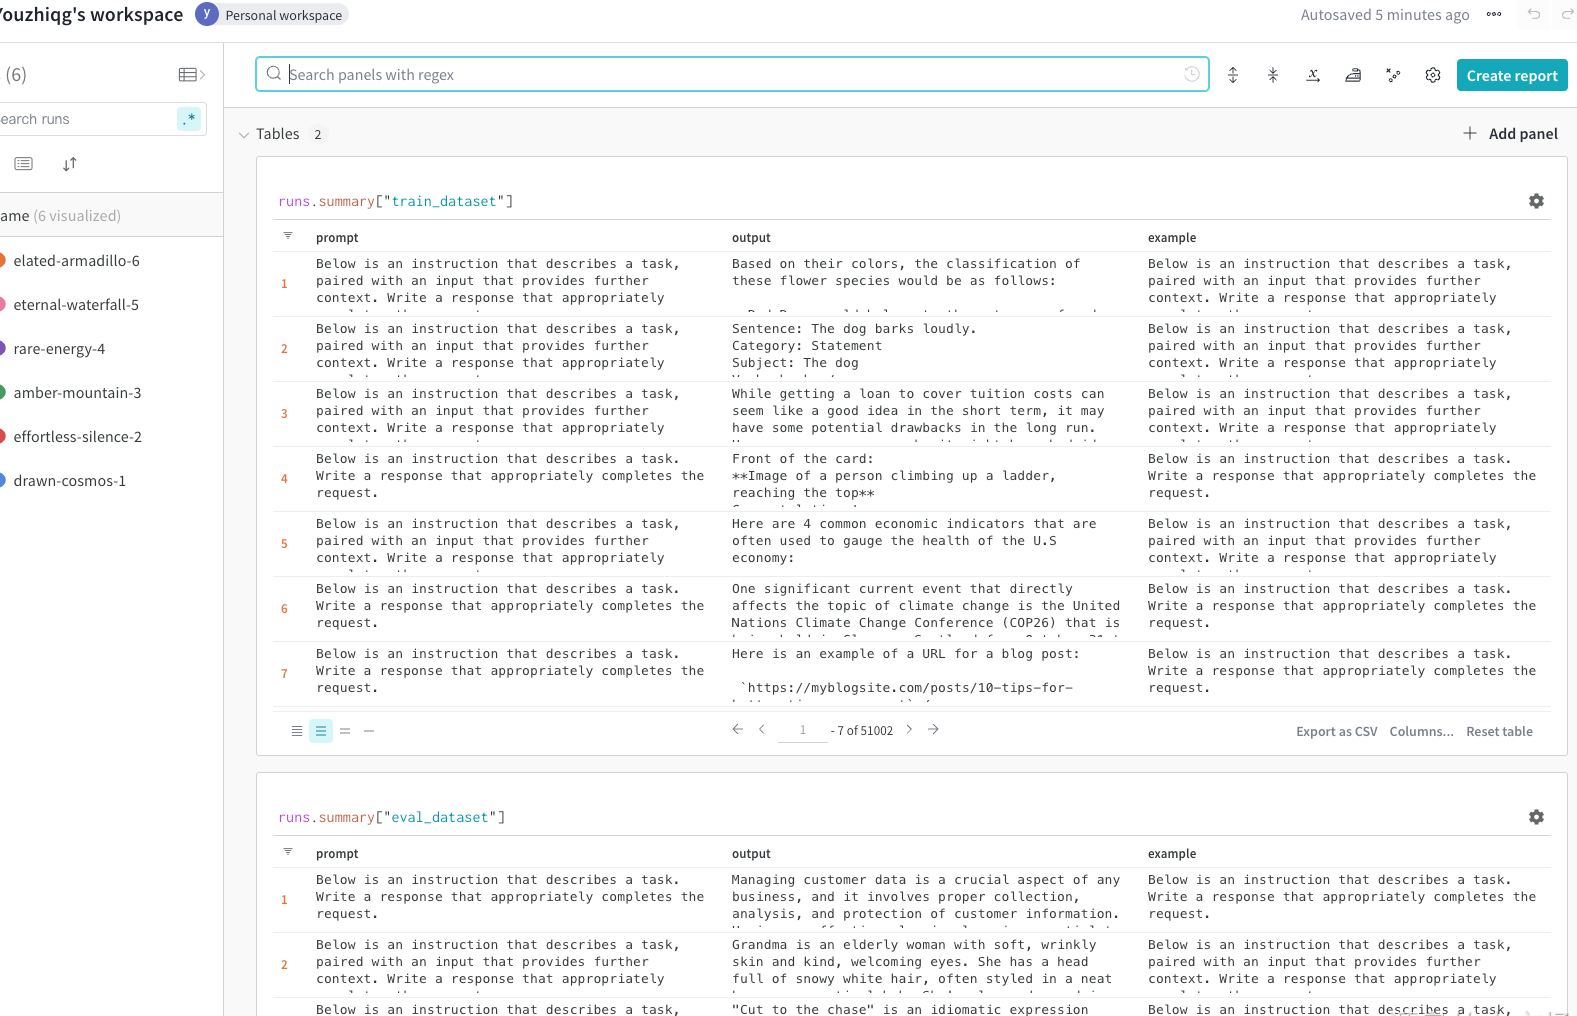
为了使训练更高效并利用这些大模型的更长上下文,引入 “打包” 的操作。将组合多个示例来填充模型的内存并使训练更高效,而不是单独提供示例。这样避免了进行大量填充和处理不同长度的情况。这里的主要思路是指令/输出样本很短,所以将它们连接在一起,用结束标记分隔开。
假设最大序列长度为 1024,则:
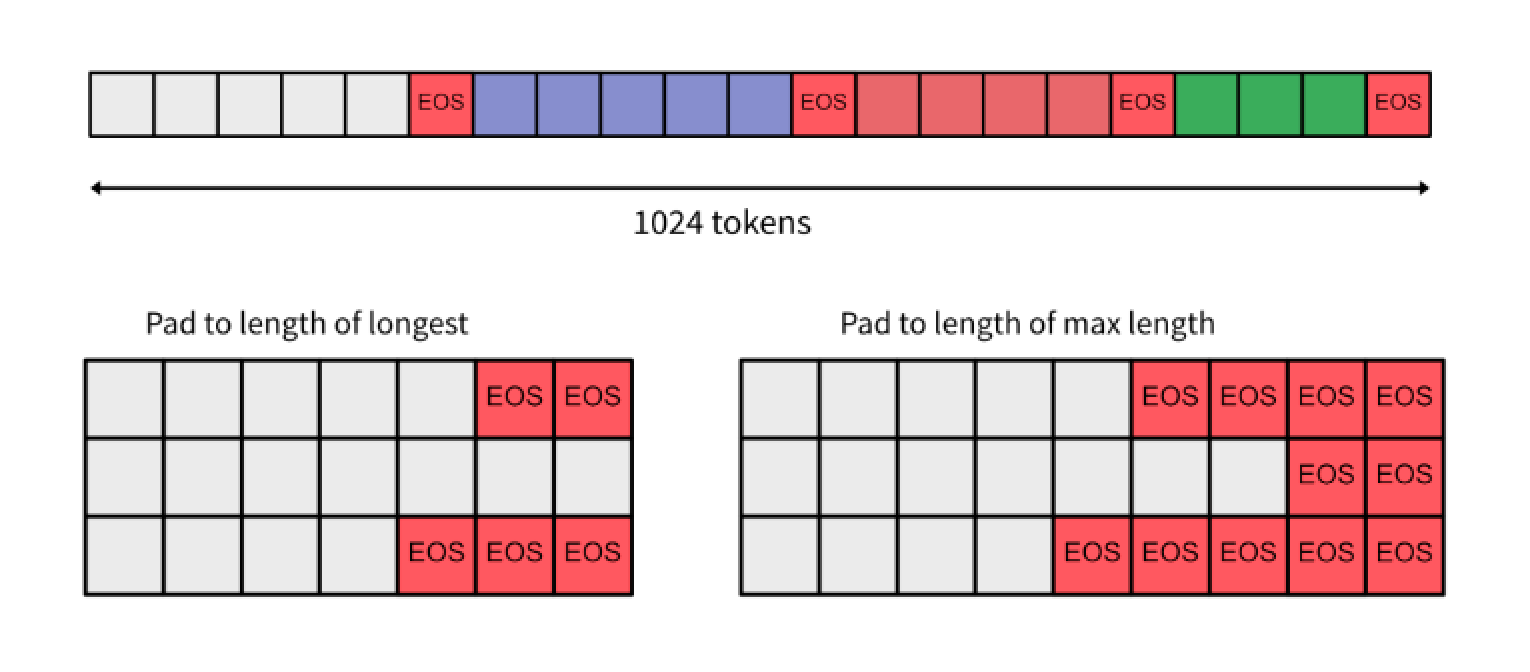
max_seq_len = 1024
def pack(dataset, max_seq_len=1024):
tkds_ids = tokenizer([s["example"] for s in dataset])["input_ids"]
all_token_ids = []
for tokenized_input in tkds_ids:
all_token_ids.extend(tokenized_input + [tokenizer.eos_token_id])
packed_ds = []
for i in range(0, len(all_token_ids), max_seq_len+1):
input_ids = all_token_ids[i : i + max_seq_len+1]
if len(input_ids) == (max_seq_len+1):
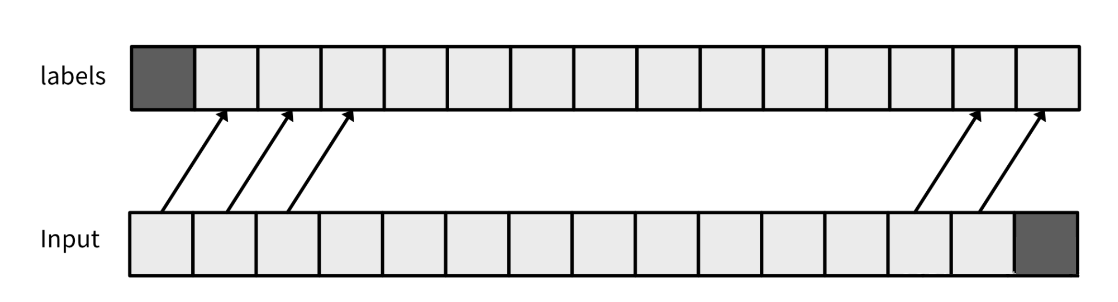
packed_ds.append({"input_ids": input_ids[:-1], "labels": input_ids[1:]})
return packed_ds
train_ds_packed = pack(train_dataset)
eval_ds_packed = pack(eval_dataset)3.3 模型微调
如上述代码所示,标签将是向左移动一位的输入。使用常规的交叉熵进行训练,并在这个打包后的数据集上预测下一个标记。
from torch.utils.data import DataLoader
from transformers import default_data_collator


batch_size = 8

train_dataloader = DataLoader(
    train_ds_packed,
    batch_size=batch_size,
    collate_fn=default_data_collator,
)

eval_dataloader = DataLoader(
    eval_ds_packed,
    batch_size=batch_size,
    collate_fn=default_data_collator,
    shuffle=False,
)
检查一下数据:
b = next(iter(train_dataloader))

b.keys(), b["input_ids"][0][:25], b["labels"][0][:25]

>> (dict_keys(['input_ids', 'labels']),

tensor([ 1, 13866, 338, 385, 15278, 393, 16612, 263, 3414, 29889,

14350, 263, 2933, 393, 7128, 2486, 1614, 2167, 278, 2009,

29889, 13, 13, 2277, 29937]),

tensor([13866, 338, 385, 15278, 393, 16612, 263, 3414, 29889, 14350,

263, 2933, 393, 7128, 2486, 1614, 2167, 278, 2009, 29889,

13, 13, 2277, 29937, 2799])) ### <<< ---- 移动一个token

# input_ids.shape: (8, 1024), labels.shape: (8, 1024)
使用PyTorch来训练模型,简单地让模型完成句子。将配置的超参数存储在一个SimpleNamespace中。它像字典一样,但可以通过点操作符访问属性。例如,可以通过config.batch_size来访问批量大小,而不是使用config["batch_size"]。
另外也需要使用一些必要的技巧:
只训练模型参数的一个子集,而不是整个模型。
使用梯度检查点(Gradient Checkpointing)来节省GPU内存。检查点是一种通过在反向传播过程中消除并重新计算某些层的激活值来减少内存使用的方法,它用更多的计算时间换取更少的内存消耗。
自动混合精度(Automatic Mixed Precision):这种技术使得训练速度显著加快,因为计算是在半精度(float16或bfloat16)下完成的。
实现一个评估步骤,定期从模型中采样。
from types import SimpleNamespace

# 计算梯度累积步骤数,32为总步数,batch_size为每批次的大小
gradient_accumulation_steps = 32 // batch_size

# 创建一个配置对象,用于存储模型训练的超参数
config = SimpleNamespace(
    model_id='meta-llama/Llama-2-7b-hf',  # 使用的预训练模型
    dataset_name="alpaca-gpt4",  # 使用的数据集名称
    precision="bf16",  # 选择精度,bf16比fp16更快更好
    n_freeze=24,  # 冻结的层数,Llama 7B模型有32层,这里冻结24层
    lr=2e-4,  # 学习率
    n_eval_samples=10,  # 验证时生成的样本数量
    max_seq_len=max_seq_len,  # 序列的最大长度
    epochs=3,  # 在数据集上训练的轮次
    gradient_accumulation_steps=gradient_accumulation_steps,  # 每隔多少次迭代更新梯度,模拟更大的批次大小
    batch_size=batch_size,  # GPU能够处理的批次大小,取决于训练的层数
    log_model=False,  # 是否将模型上传到W&B(Weights & Biases)
    mom=0.9,  # 优化器参数中的动量值
    gradient_checkpointing = True,  # 是否使用梯度检查点,以进一步节省内存
    freeze_embed = True,  # 是否冻结嵌入层,通常不需要训练嵌入层,所以保持冻结状态
)

config.total_train_steps = config.epochs * len(train_dataloader) // config.gradient_accumulation_steps
GPU 对 2 的幂次的 batch 可以发挥更好性能,因此batchsize设置成 16、32等。关于该参数的讨论,可以参考深度学习Batch Size玄学被打破。
设置预训练模型的参数:
model = AutoModelForCausalLM.from_pretrained(
    config.model_id,
    device_map=0,
    trust_remote_code=True,
    low_cpu_mem_usage=True,
    torch_dtype=torch.bfloat16,
    use_cache=False,
)冻结模型以节省内存,训练整个模型代价昂贵,因此本文只训练模型参数的一个子集。基于Transformer的模型(如Llama)是一层层堆叠的相同结构,最后有一个分类层。Llama 2-7b有32个Transformer层,因此我们只会训练最后8层。当然也可以尝试冻结多少层进行实验,但总要训练分类头,即对预测的最后一层进行训练。通过不在冻结的层上计算梯度,这样可以节省大量内存。甚至也可以通过冻结嵌入层来获得更多的内存节省。另外,关于如何在内存中适配大模型,可以参考这个文献(Performance and Scalability: How To Fit a Bigger Model and Train It Faster)。
n_freeze = 24  #冻结前24层
for param in model.parameters(): param.requires_grad = False
for param in model.lm_head.parameters(): param.requires_grad = True
for param in model.model.layers[n_freeze:].parameters(): param.requires_grad = True

# 是否对嵌入层进行冻结
if config.freeze_embed:
    model.model.embed_tokens.weight.requires_grad_(False);

# 通过设置梯度检查点来节省内存
if config.gradient_checkpointing:
    model.gradient_checkpointing_enable(gradient_checkpointing_kwargs={"use_reentrant": False})
需要为训练设置优化器和学习率调度器。这两个关键配置来告诉 PyTorch 如何计算优化步骤并相应地调整学习率。这里使用Adam 和余弦调度。使用 bfloat 设置训练循环。把损失函数设置为交叉熵。
from transformers import get_cosine_schedule_with_warmup


optim = torch.optim.Adam(model.parameters(), lr=config.lr, betas=(0.9,0.99), eps=1e-5)
scheduler = get_cosine_schedule_with_warmup(
    optim,
    num_training_steps=config.total_train_steps,
    num_warmup_steps=config.total_train_steps // 10,
)

def loss_fn(x, y):
    "A Flat CrossEntropy"
    return torch.nn.functional.cross_entropy(x.view(-1, x.shape[-1]), y.view(-1))
接下来设置模型的训练过程观察对象。创建一个简单的函数从模型中采样,从而直观地看到模型的输出是什么,设置获取默认的采样参数,并传入相应的模型 ID。保存诸如温度、top_p 等参数的默认值。每十分之一的总训练步骤中在评估数据集上运行模型,并记录模型预测结果。
from transformers import GenerationConfig


gen_config = GenerationConfig.from_pretrained(config.model_id)


def generate(prompt, max_new_tokens=100, gen_config=gen_config):
    with torch.inference_mode():
        tokenized_prompt = tokenizer(prompt, return_tensors='pt')['input_ids'].cuda()
        output = model.generate(tokenized_prompt,
                            max_new_tokens=max_new_tokens,
                            generation_config=gen_config)
    return tokenizer.decode(output[0][len(tokenized_prompt[0]):], skip_special_tokens=True)


def prompt_table(prompts, log=True):
    table = wandb.Table(columns=["prompt", "generation", "concat", "max_new_tokens", "temperature", "top_p"])
    for prompt in progress_bar(prompts):
        out = generate(prompt, test_config.max_new_tokens, test_config.gen_config)
        table.add_data(prompt, out, prompt+out, test_config.max_new_tokens, test_config.gen_config.temperature, test_config.gen_config.top_p)
    if log:
        wandb.log({"predictions":table})
    return table
接下来,是设置验证集评估。在验证数据集上计算指标可以对训练的进展有直观的了解。对于大模型,还需要从模型中采样以可视化与你的数据的对齐情况。遍历评估数据加载器并累积损失和准确率。
@torch.no_grad()
def validate():
    model.eval();
    eval_acc = Accuracy()
    for step, batch in enumerate(tqdm(eval_dataloader)):
        batch = to_gpu(batch)
        with torch.amp.autocast("cuda", dtype=torch.bfloat16):
            out = model(**batch)
            loss = loss_fn(out.logits, batch["labels"])  # you could use out.loss and not shift the dataset
        eval_acc.update(out.logits, batch["labels"])
    # we log results at the end
    wandb.log({"eval_loss": loss.item(),
               "eval_accuracy": eval_acc.compute()})
    prompt_table(eval_dataset[:config.n_eval_samples], log=True)
    model.train();
最后就开始循环训练了。遍历训练数据加载器,并在固定的步数后进行评估。它在训练结束时保存模型。
wandb.init(project="alpaca_ft",
           tags=["baseline","7b"],
           job_type="train",
           config=config)


# 训练
acc = Accuracy()
model.train()
train_step = 0
pbar = tqdm(total=config.total_train_steps)
for epoch in range(config.epochs):
    for step, batch in enumerate(train_dataloader):
        batch = to_gpu(batch)
        with torch.amp.autocast("cuda", dtype=torch.bfloat16):
            out = model(**batch)
            loss = loss_fn(out.logits, batch["labels"]) / config.gradient_accumulation_steps  # you could use out.loss and not shift the dataset
            loss.backward()
        if step%config.gradient_accumulation_steps == 0:
            wandb.log({"train/loss": loss.item() * config.gradient_accumulation_steps,
                       "train/accuracy": acc.update(out.logits, batch["labels"]),
                       "train/learning_rate": scheduler.get_last_lr()[0],
                       "train/global_step": train_step})
            optim.step()
            scheduler.step()
            optim.zero_grad(set_to_none=True)
            train_step += 1
            pbar.update(1)
    validate()
pbar.close()

# 保存 model checkpoint
save_model(
	model,
	model_name=config.model_id.replace("/", "_"),
	models_folder="models/", log=config.log_model)

wandb.finish()
另外在大模型场景中,评估模型的好坏,还可以用更强大的预训练模型来作为评估器,因为强大的LLM(比如gpt-4)可以说一定程度上超过人类的能力,而且人工成本更高,所以采用gpt-4来做评估器,不失为一种可行解。之前和业内某大佬聊起来,他们在某些to B场景中,也会采用公开的强大的预训练模型来快速获得基准评估结果作为参考。
def gpt4_judge(instruction, gen1, gen2, model="gpt-4"):
system_prompt = ("You will be presented with a choice of two possible responses for an instruction"
"You have to pick the best one and give a reason why.\n"
"The reponse should follow the instructions and use the provided context if there is some\n"
"If both answers are equivalent, pick the value 0")
message = "{instruction}\n Answer 1: \n{gen1}\n Answer 2:\n{gen2}".format(instruction=instruction, gen1=gen1, gen2=gen2)
completion = openai.chat.completions.create(
model=model,
messages=[{"role": "system",
"content": system_prompt,
},
{"role": "user",
"content": message,
},],
function_call = {"name": "make_choice"},
functions = [{
"name": "make_choice",
"description": "Select the best generation and explain why",
"parameters": {
"type": "object",
"properties": {
"choice": {
"type": "integer",
"description": "the choosen alternative, zero if equivalent",
},
"argument":{
"type": "string",
"description": "Reason why the choice was made",},},},
"required": ["choice", "argument"],},
],)
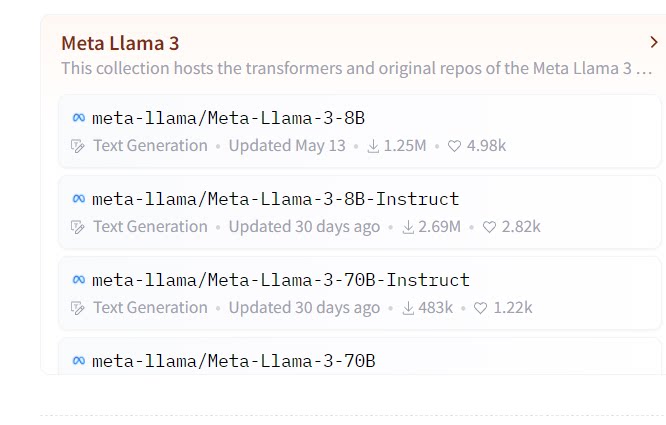
return completion四、大模型根据指令微调的命名
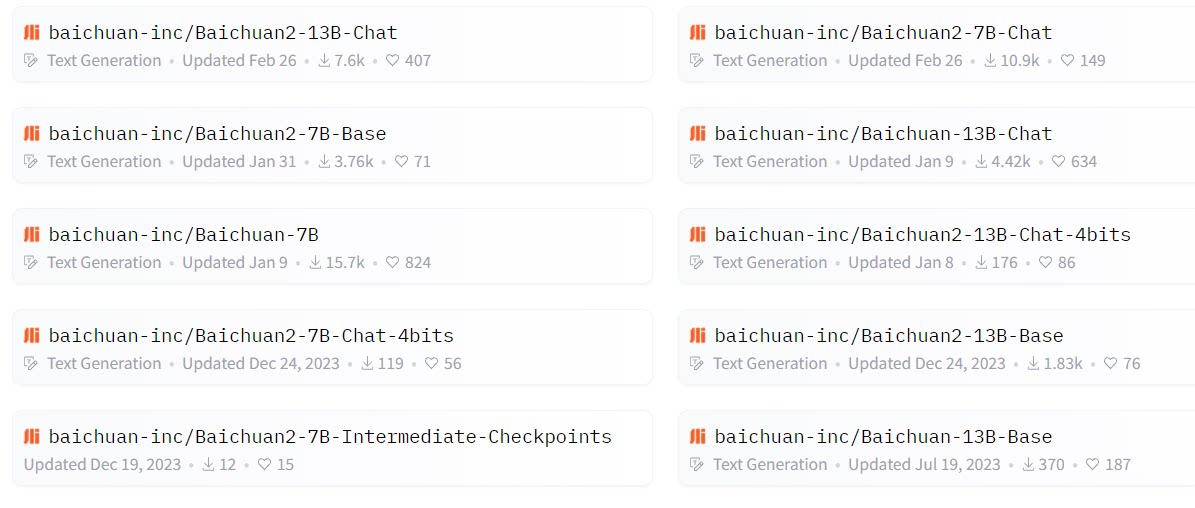
很多开源大模型除了开源基础模型,还会提供指令微调后的版本。其中带“Instruct ”后缀的就是指令微调后的模型。不带的就是预训练完的基础模型。一般来说基础版本的NLP模型有更强的NLP能力,在CEval等项目的跑分更高,但是指令微调后的模型能更好的遵循指令执行文本描述的各种任务。
但是指令微调数据也有很多种,如机器翻译、文本摘要和文本分类和对话等。有些开源模型是为了跟人对话,这种开源大模型的名字往往包含“chat”,比如百川的大语言模型,带“base”的就是预训练完毕的大语言模型,而带“chat”的就是使用会话指令微调后的模型。当然chat模型微调数据肯定不会只有会话,可能有很多种,不同的大模型混合数据集的策略各有侧重。